Eight or ten frame? Wax or plastic foundation? Screen or no screen for the bottom board? There are so many choices when it comes to beekeeping equipment that, for a beginner, it can become overwhelming and discouraging at a time already filled with questions and uncertainty. This article is designed to help you sort out the necessary and unnecessary, and hopefully give you some confidence when making your equipment decisions.
FOR THE BEEKEEPER
In this section I will cover the equipment needed for the beekeeper. If you have more than one prospective beekeeper in the house, consider getting the items discussed here for them as well.
PROTECTIVE GEAR
As I discussed in the first section of the “Getting Started In Beekeeping” series, severe or “deathly” allergic reactions to honey bee venom are rare. Between 1% and 3% of humans experience anaphylactic reactions that require immediate medical attention and can sometimes be fatal. I say that to put the danger in perspective for you, although there is some risk, the chances of something drastic and threatening happening to you are very low. That being said, the chances are not zero and due to the severity of the improbable reaction, precautions and protection should not be overlooked.
Aside from the possible medical implications, stings hurt. If you get stung once or a few times when getting into your hives and the memory and shock of the incident linger with you, it can become more difficult to muster up the courage and energy to work your bees, which can lead to problems that will only make your first beekeeping year more of a challenge. So, the bottom line is, get as much protective equipment as it takes to make you comfortable walking out to your bees and calm while you inspect your hive(s).
BEE SUITS/JACKETS
In this department the saying, “you get what you pay for”, really rings true. If you want a bee jacket or suit that will last you more than a full year, expect to pay for it. While there are cheaper versions of jackets that may work well for a while, they always seem to rip and tear and the zippers that close everything up always seem to separate and allow kamikaze bee infiltration. During your first year it can be a frightening thing to hear the buzz of a bee that is COMING FROM INSIDE THE HOUSE! So, get a nice vented jacket with good reviews and you’ll be like Little Richard humming, “you keep on knocking but you can’t come in.”
Recommended: Vented Jacket w/ Veil
GLOVES
Gloves, unlike bee suits and jackets, are a dime a dozen and I have not found any one type to be superior. Get what looks and feels comfortable, making sure it can easily be thrown into the washing machine. At some point I encourage each beekeeper to start weening themselves from the gloves as the dexterity loss can cause clumsy issues that don’t seem to be a problem when unencumbered by gloves.
Recommended: Vented Cowhide Gloves
HIVE TOOL
Honey bees naturally “glue” everything together in their hive using a substance called propolis. They create this substance with tree sap and the moniker, “bee glue”, is apt. For this reason a hive tool is a necessity when trying to pry off inner covers or separate frames. There are many designs and forms of hive tool, check them out and pick the one you like the most!
Recommended: 9” Simple Hive Tool
SMOKER
A fairly common misconception among new beekeepers is that smoke is a luxury or unnecessary for every visit to the bee yard. Beehive inspections rarely go completely as planned and going in without having a smoker lit and ready is a foolhardy move. In this department I recommend getting a trusted brand and model for durability and longevity.
Recommended: 4” x 7” Stainless Steel Smoker w/ Guard
FOR THE BEES
I will lay out the equipment you will need for the entire year for ONE beehive. Multiply these amounts by the amount of beehives you are planning to start. I always recommend that beginners start with at least two colonies, and it is a good idea to always have at least one extra hive’s worth of equipment to deal with swarms and swarm control splits.
HIVE BODIES
Hive bodies come in various depth sizes (shallow, medium and deep) and width sizes (8 or 10 frames). The differences mean nothing to the bees and the choice is yours, if you have trouble lifting heavy things you may want to consider either 8 framers or medium boxes.
THE BROOD NEST
This section will talk about the boxes you need for your hive’s brood nest. The brood nest is what it sounds like, the section of the hive where eggs are laid and the young bees are cared for.
Assuming you followed my recommendation in the first section of “Getting Started In Beekeeping” and purchased (or plan on purchasing) a nucleus colony, you will want to get deep boxes for the brood nest. This will ensure compatibility between nuc equipment and the 10 frame equipment into which you plan on installing your bees. The standard brood nest size for 8 or 10 frame deeps is two boxes, for 10 frame mediums you will want at least 3.
Recommended: 2 Deep 10 Frame Langstroth Boxes
HONEY SUPERS
This section deals with the boxes that will store honey reserves, usually kept above the brood nest, sometimes separated by a queen excluder (to ensure no eggs are laid in the honey supers). The amount of honey supers necessary is not as black and white as the brood boxes. The amount of honey stored each year is variable and difficult if not impossible to predict. Err on the side of more rather than less if you have the financial capability.
Honey can be stored in any sized hive body, but smaller boxes are usually preferred here due to the immense weight of a full box of honey. However, the overall weight of the honey boxes does not have to be a prohibiting factor to your decision, if the box is full and difficult or impossible to pick up you can harvest it a frame at a time and save your back and fingers the hassle.
For the sake of continuity I recommend purchasing only deep boxes. That way every frame fits in every box and when the honey is harvested the frames can go into the brood boxes to be filled with eggs and larvae.
If deep honey supers aren’t something you want, you can go with mediums or shallows, you’ll just need more of them per hive.
Recommended: 2 Deep 10 Frame Boxes or 3 Medium 10 Frame Boxes
FRAMES AND FOUNDATION
In this section I will talk about the frames and foundation that fill up each box. I wrote an article on this subject, as there are many choices and each option has its own pros and cons. The only requirement in this decision is that you pair the frames with the corresponding boxes in amount and size. Most beekeeping supply stores have a color coding system to make this a bit easier, but know that a deep box should be filled with 9 1/8” deep frames.
All plastic frames are inferior, in my opinion, as they bend during inspections and have crevices that allow small hive beetles safe places to escape the bees that would otherwise remove them. That being said, I do like the plastic foundation for its durability and longevity. The only downside to the plastic foundation is that sometimes it comes thinly coated with beeswax, causing the bees to ignore it or draw weird comb formations instead of uniform outward facing cells. The fix for that is to paint the plastic foundation sheets with extra layers of beeswax before inserting them into the hive. So, wooden (grooved top bar and bottom bar) frames and plastic foundation are by far the best option for me.
Recommended: Wooden Grooved Top & Bottom Bar Frames and Plastic Foundation
COVERS
I recommend both an inner cover and outer/telescoping cover for your bees, especially if you are in an area that has a cold winter. Migratory tops are cheaper and don’t require an inner cover but don’t offer the same advantages for overwintering that the inner/outer covers do. Make sure your inner cover has a hole in the middle for feeding and moisture transference in the winter. If the inner cover you purchase does not have an upper entrance cut you can cut one yourself or purchase an upper entrance shim (the shim also allows for space for dry sugar during the winter and is my preferred method for upper entrance).
Recommended: 10 Frame Telescoping Cover w/ Inner Cover + Upper Entrance Shim
BOTTOM BOARD
The only real question when it comes to bottom boards is, screen or no screen. There are pros and cons to both types and each has their own set of beekeepers that swear by them. I tend not to see too much of a difference between the two until it comes to the extreme temperature portions of the year. The open screen allows for more ventilation and easier cooling during summer, and can make heat generation and maintenance more difficult for the winter cluster. That being said I have seen hives survive well during cold winters above screens and I have seen colonies produce box after box of honey during a hot summer above a closed bottom board. Make your decision with those factors in mind and if you cannot see a clear advantage to either, go with the cheaper closed bottom board.
Recommended: 10 Frame Bottom Board w/ Entrance Reducer
FEEDER
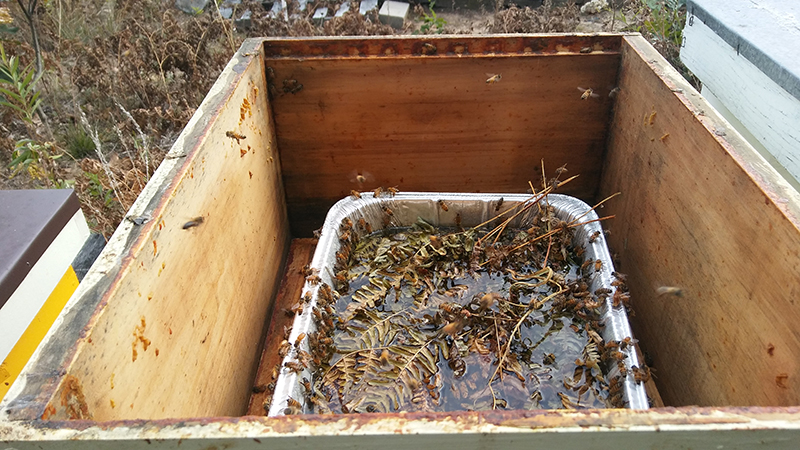
Entrance feeders, hive top feeders, frame replacement feeders or communal buckets? When it comes to feeding our bees we have many choices at our disposal. For this decision I like to think about the entire year, not just spring when most colonies are building up and not interested in robbing. If you are going to purchase a feeder that will work well in both spring and fall, it has to be one where the food is placed inside the hive and away from would be robber bees. Hive top feeders as purchased from beekeeping supply stores are great, but expensive, frame replacement feeders are cheap and useful, but difficult for pre-winter feeding as they take up the space of a frame or two. So, without any perfect options I went full DIY for a solution. My method is dubbed the “hillabilly hive top feeder” and requires a disposable aluminum baking pan and an extra deep box. Place the baking pan above the inner cover, on two sticks (to allow space for the bees to crawl up) and encase it in the extra hive box with the outer cover on top. Make sure to fill the baking pan with something that will allow the bees to drink and not drown (I like pine needles or fern leaves) and fill it up with sugar syrup. This method is great because the pans hold ½ gallon of syrup and you don’t have to fully enter the hive to refill.

Recommended: Hillabilly Hive Top Feeder (aluminum baking pan and an extra deep box)


